        |
Tuesday, 2 April 2013
Monday, 1 April 2013


Monday, 25 March 2013
Bimbipap
簡單作法~
1. 將石鍋內塗上麻油再乘入白飯,再將準備好的小菜(泡菜、菠菜、豆芽菜、香菇...等等)排到飯上,再加入炒好的牛(豬)絞肉和荷包蛋。
2. 將石鍋放在瓦斯爐上直接開火燒個3~4分鐘,上桌後淋上韓式辣醬攪拌就可以開動嚕!!
1. 將石鍋內塗上麻油再乘入白飯,再將準備好的小菜(泡菜、菠菜、豆芽菜、香菇...等等)排到飯上,再加入炒好的牛(豬)絞肉和荷包蛋。
2. 將石鍋放在瓦斯爐上直接開火燒個3~4分鐘,上桌後淋上韓式辣醬攪拌就可以開動嚕!!


recipe for the bibimbap from here and kimchi here. do note that the recipe for the kimchi uses 10 pounds/4.5kg of napa cabbage (gasps!) so i scaled down and divided the ingredients by 4.
Tuesday, 19 March 2013
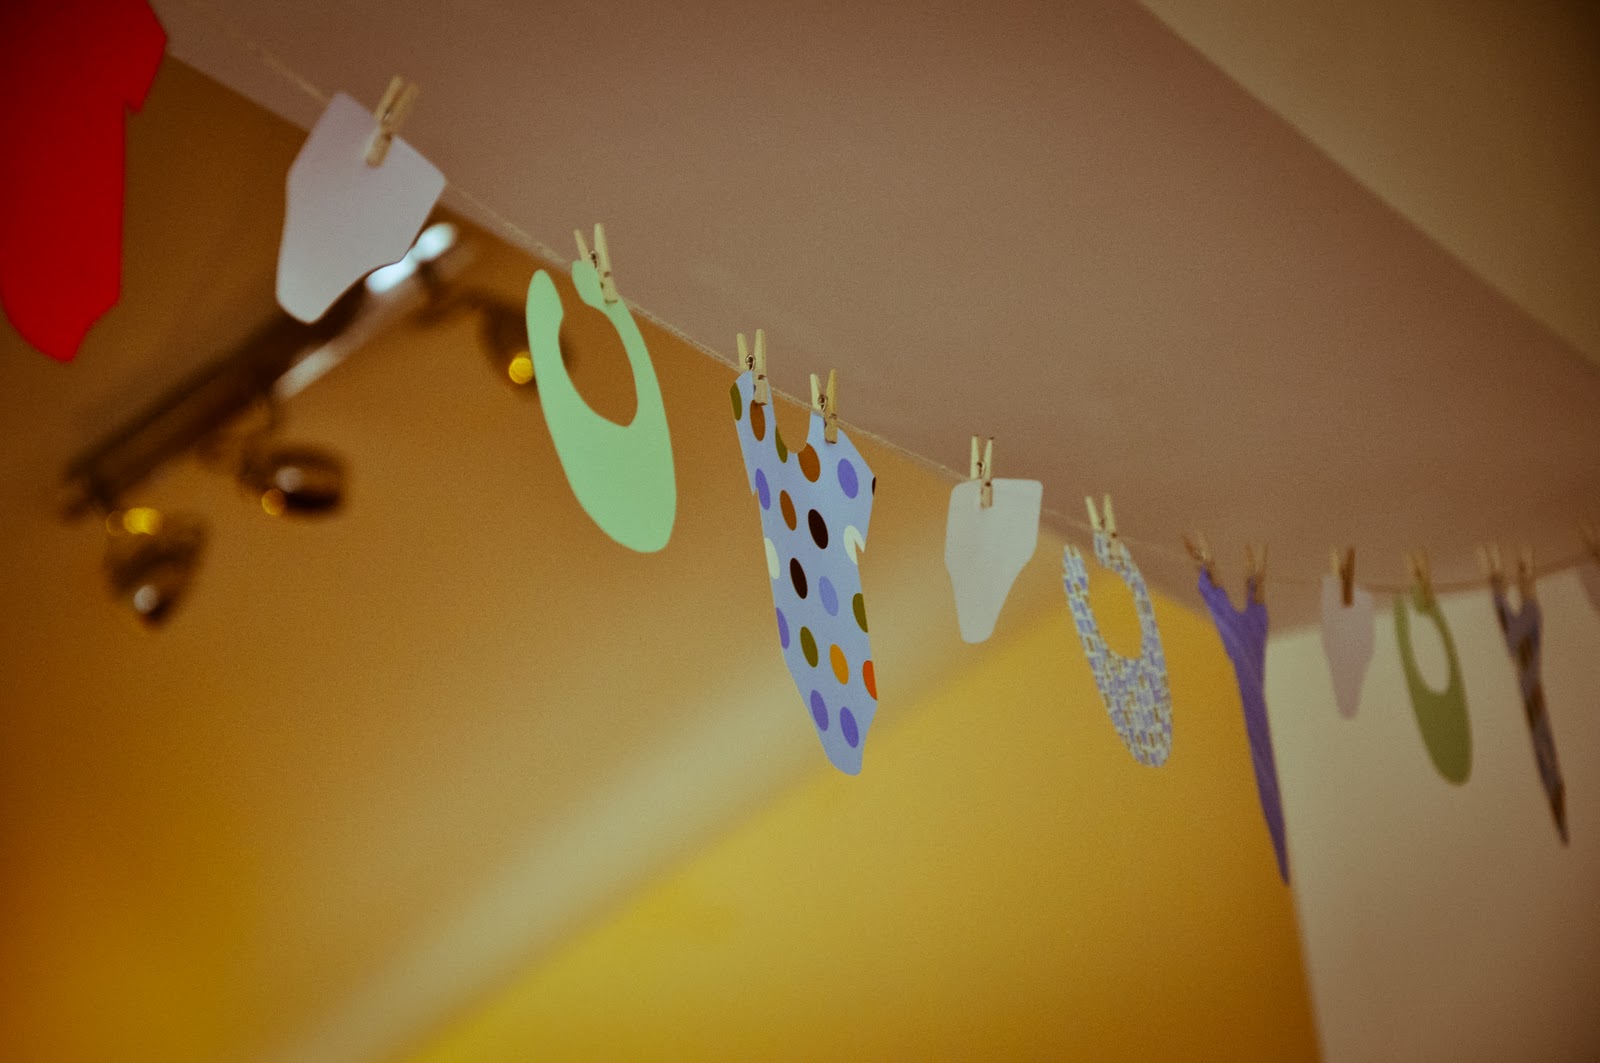
DIY baby shower clothesline bunting
So, you'd like to make some clothesline bunting for a baby shower? You've come to the right place.
What you'll need:
Paper
Scissors
A pencil
String
Mini wooden clothes pegs
1. Choose a colour scheme.
This baby shower was for a baby boy (well, the party itself was for the mother, but she was expecting a boy) so I chose some patterned paper which would work for a baby boy colour scheme and used those colours: blue, green and orange.
[Tip: by choosing the colours within a patterned paper, you don't have to think so hard about whether your colours will work with each other or not. It's a lazy way of picking a colour scheme, but it works.]

2. Once you've got your colour scheme and chosen your papers, you'll need a template to draw around. I've uploaded a PDF here which you can download and print. Cut your template out of card so that it is sturdy enough to draw around.

3. Draw around your templates on the back of the patterned paper. I went with bodysuits, bibs and nappies (diapers). I chose to stick to white nappies to break up the colour a bit. But you can do whatever you like - it's your bunting.

4. Cut out your shapes.
5. When at the baby shower venue, put up the string.
6. Once it's secure, arrange your paper shapes and attach them with mini wooden pegs.


7. Stand back and admire your handiwork.


This is so simple to make and so pleasing to look at and it could easily be used at future baby showers. It would be really straightforward to adapt the colour scheme.
This has got me thinking about the next baby shower, which will be after Christmas. That shower is also for a boy but I'm trying to think of a completely different colour scheme (all ideas welcome)...
Hope you're having a great weekend,
Pips :)
What you'll need:
Paper
Scissors
A pencil
String
Mini wooden clothes pegs
1. Choose a colour scheme.
This baby shower was for a baby boy (well, the party itself was for the mother, but she was expecting a boy) so I chose some patterned paper which would work for a baby boy colour scheme and used those colours: blue, green and orange.
[Tip: by choosing the colours within a patterned paper, you don't have to think so hard about whether your colours will work with each other or not. It's a lazy way of picking a colour scheme, but it works.]

2. Once you've got your colour scheme and chosen your papers, you'll need a template to draw around. I've uploaded a PDF here which you can download and print. Cut your template out of card so that it is sturdy enough to draw around.

3. Draw around your templates on the back of the patterned paper. I went with bodysuits, bibs and nappies (diapers). I chose to stick to white nappies to break up the colour a bit. But you can do whatever you like - it's your bunting.

4. Cut out your shapes.
5. When at the baby shower venue, put up the string.
6. Once it's secure, arrange your paper shapes and attach them with mini wooden pegs.

7. Stand back and admire your handiwork.


This is so simple to make and so pleasing to look at and it could easily be used at future baby showers. It would be really straightforward to adapt the colour scheme.
This has got me thinking about the next baby shower, which will be after Christmas. That shower is also for a boy but I'm trying to think of a completely different colour scheme (all ideas welcome)...
Hope you're having a great weekend,
Pips :)
DIY Party Week :: It's a BOY, Baby Shower.
Hi there! Is it just me, or is your instagram and facebook feed chalk full of baby bumps and happy moms to be? It is fun to share in the excitement and it gets the creative wheels turning! Hence today's party theme... It's a BOY, baby shower.

An otherwise girly 3d bow from the online store, is transformed into a perfect bow tie when cut out of black cardstock.

Use that same bow tie on a larger scale, added to the front of a treat bag with an "Oh Boy!" tag for party favors.

It definitely doesn't hurt to throw a mustache or two in there on drink straws and as cupcake toppers.

One of my favorite elements is the flocked heat transfer bow tie onsie!

Heat transfer is a super quick way to embellish apparel and paper crafted projects. If you are new to heat transfer, here are some tips to get you started.
The flocked heat transfer is 9" wide, so the first thing you'll want to do is open the Page settings window, and change the height to 9".

Next, create your design. Then, be sure to mirror your image. You can do that with a quick right click of the mouse, then select flip horizontally.

Next if you are using a CAMEO, you'll want to adjust the roller to the inside notch.

Then, place the heat transfer, shiny side down up against the rollers and select load media.

Back to Silhouette studio, open the Cut Settings window and select 'flocked heat transfer' from the menu and you are all set to cut.
Once the shapes are cut, remove the excess heat transfer, and use the hook tool to weed out any small pieces that aren't part of your design.
Then, flip the image over and place it on your project.
Next, cover the image with a piece of fabric and press firmly with a hot iron for approximately 45-60 seconds.

Let it cool slightly, then remove the clear backing.

Easy peasy bow tie onsie that doubles as baby shower decor.
If you are feeling adventurous and want different colors in your design, you can even layer the flocked heat transfer like in this 'mom's little man' onsie. The black heat transfer shape was put down first. Then I repeated the process with the grey 'little'. I love how it turned out...

If you are feeling adventurous and want different colors in your design, you can even layer the flocked heat transfer like in this 'mom's little man' onsie. The black heat transfer shape was put down first. Then I repeated the process with the grey 'little'. I love how it turned out...
Thanks for stopping by... and have a great day, everyone!
Shapes:
disguises {bow tie}
Tuesday, 12 March 2013
妈蜜排骨

Link
材料Ingredients
排骨 300g
生菜 [摆盘]
炸粉适量。木薯粉 + 面粉 [1对1]
腌制Marinate
盐 1/3茶匙
蛋 1 颗 [打散]
英国咖喱粉 1茶匙
蚝油 1大匙
糖 1/2茶匙
胡椒粉 少许
料理酒 1大匙
麻油 少许
**腌制至少2小时**
调味Seasoning
妈蜜 2 大匙
蚝油 1 茶匙
麦芽糖 1 大匙
生抽 1 茶匙
糖 1 茶匙
清水 6大匙
**事先拌匀**
做法Method
1.腌制排骨均匀沾上炸粉, 中火炸直半金黄, 捞起沥干, 大火翻炸30秒直香脆
[注: 翻炸时必须不停翻搅, 炸出来的排骨色泽才会均匀]
2. 调味料烧热, 下排骨快速翻炒, 上桌趁热享用
Wednesday, 6 March 2013
All About the Packaging: Candy Button Punch Box Tutorial
We created this punch box to use for the Candy Button Trivia game we played at ourMaddie-licious party. It’s pretty easy but does take a little bit of time.
You’ll need:
4 white poster boards
a circle cutter
tissue paper in the colors of your choice
glue
18 paper lunch bags
prizes
packing tape
ribbon
a circle cutter
tissue paper in the colors of your choice
glue
18 paper lunch bags
prizes
packing tape
ribbon
First, start cutting circles on your poster board. We set our circle cutter to 5 inches. This let us make three columns of three circles each per poster board. You can choose to make smaller or larger circles.

Your poster board will look like this after you’ve finished.

Repeat the process on the second poster board. Now start cutting out the tissue paper and gluing the squares over each circle. We cut ours into 6×6 inch squares as our circles were 5 inches.

We recommend cutting individual squares since punching out one hole may pull the paper off the others. Once you have all the circles covered, tape them together to form one long strip. You should then have something that looks like this.

Next, take the remaining two poster boards and cut them in half length-wise.

Then fold each piece in half length. These will be the side panels of the punch box.

Lay the smooth side of the poster board (the edge you didn’t cut) next to the poster board with the cut-outs. Line up the top edges and tape together.
")
Next, take your lunch bags and cut off the top 6 inches. (We saved the tops and made small snack bags by gluing and folding the bottoms shut.) Take the bottom half of the bag and start making 1 inch cuts along the top and then fold them over. These tabs will be what you use to tape them down. Repeat with all the bags.
")
Lay out the board and place a prize on each circle so the prizes are evenly distributed. Then cover each one with a paper bag and tape down.
")
Once all the bags are attached, fold over the side panels to cover the bags. You may have to tape the side panels together across the back. Thread some ribbon across the top, hang it up and you are ready to go!

from http://blog.celebratethebigandsmall.com/2011/09/29/all-about-the-packaging-candy-button-punch-box-tutorial/
Subscribe to:
Comments (Atom)